
Let me start by telling you something important: growing orchids at home is a lot easier than most people think.
I used to believe it was complicated, that it required a greenhouse, advanced knowledge, or that orchids would just “die on you” if you did anything wrong.
But after a few mistakes and a bit of practice, I learned that orchids are not as fragile as they seem—and with the right approach, you can keep them healthy, blooming, and beautiful, even if you live in a small apartment with no garden.
So if you’ve always wanted to grow an orchid—or if you already have one and it’s just not doing well—stick with me, because I’m about to share the 10 Tips for Growing Orchids at Home that have actually worked for me in real life.
1. Start with the right species—it makes a huge difference
This is one of the things no one tells you in the beginning, but it completely changes your experience.
Some orchid species are high-maintenance and not ideal for beginners, while others are much more forgiving.
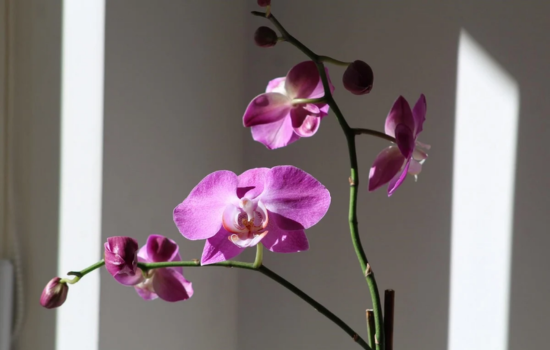
If you’re just starting out, I highly recommend Phalaenopsis—also known as the moth orchid. It’s strong, adaptable to indoor environments, and tends to bloom regularly without needing too much from you.
After trying several varieties, this one remains my go-to and has never disappointed me.
2. Never use regular potting soil—orchids hate it
This is a mistake I made early on, and it nearly cost me my first plant.
Orchids don’t grow in regular soil like garden vegetables or flowers. They need a specific kind of substrate that’s light, airy, and drains well.
The mix I use at home is a combination of pine bark, coconut fiber, charcoal, and sometimes a little sphagnum moss to hold moisture.
You can find this ready-made at any gardening store, and trust me, it makes a world of difference in how your orchid breathes and grows.
3. Choose the right pot—ventilation matters more than looks
I’ve made the mistake of choosing pretty pots over functional ones, and my orchids suffered for it.
Orchid roots need to breathe and, in many cases, benefit from light exposure too. That’s why clear plastic pots with side holes or clay orchid pots with wide openings are ideal.
They allow both airflow and light to reach the roots, which is essential for the plant’s health and growth.
4. Don’t overwater—less is often better
If there’s one thing orchids hate, it’s sitting in soggy roots.
That’s why I always test the moisture level before watering. I simply stick my finger into the substrate, and if it still feels damp, I wait a day or two. If it feels dry, it’s time to water.
At my house, watering twice a week works well in moderate weather. During hot spells, I might water a third time, but always with caution.
And here’s a tip that helped me a lot: water your orchid in the morning so it has the whole day to dry naturally.
5. Light is essential, but avoid direct sun
Orchids need a good amount of indirect sunlight to bloom consistently, but too much direct sun can burn their leaves quickly.
I keep mine near a bright window, where it gets plenty of light filtered through sheer curtains.
A good sign that your orchid is getting the right amount of light is firm, slightly bright green leaves. If they’re dark green, it probably needs more light. If they turn yellowish, it may be getting too much.
6. Use fertilizer, but don’t overdo it
Another mistake I made early on was overfeeding my orchid, thinking it would grow faster and bloom more often.
In reality, orchids are sensitive to excess nutrients, especially salt buildup in the potting mix.
What works for me is using a balanced orchid fertilizer—like 20-20-20—diluted in water, every two weeks. And once a month, I flush the pot with plain water to rinse away any excess fertilizer salts.
Since I started this routine, my orchids have shown better root growth and more frequent, long-lasting blooms.
7. Keep your orchid in one spot—consistency is key
Orchids don’t like being moved around. They need time to adjust to the lighting, humidity, and temperature of a space.
Once you find a good location—bright, warm, and protected from drafts—leave it there. Stability helps them thrive.
When I stopped constantly relocating mine, it was like flipping a switch. My orchids began growing stronger and blooming more reliably.
8. Clean the leaves regularly—it helps more than you think
Dust can block light and affect your plant’s ability to breathe properly through its leaves.
That’s why, once every couple of weeks, I gently wipe the leaves with a soft cloth dampened with water—no soap, no oil, just water.
Not only does it keep the plant looking healthy, but it also helps prevent fungal issues and allows for better photosynthesis.
9. Trim wisely—don’t rush to cut
It’s tempting to cut flower spikes the moment the blooms fade, but some orchid types (like Phalaenopsis) can re-bloom from the same spike if it’s still green.
So here’s what I do:
If the spike is dry and brown, I trim it down.
If it’s still green, I leave it alone and wait.
Also, if you see any blackened, mushy roots during repotting, go ahead and trim them using sterilized scissors to prevent the spread of rot.
10. Be patient—your orchid blooms on its own schedule
This might be the most important lesson from these 10 Tips for Growing Orchids at Home.
Orchids don’t follow our timelines. Sometimes they sit for months doing nothing, and then suddenly—when you least expect it—a new spike starts to grow.
What I’ve learned is this: the flower is just the result of consistent, gentle care over time. You can’t force it, but when it comes, it’s worth every second you waited.
Quick recap: 10 Tips for Growing Orchids at Home
Now that we’ve gone through each tip, let’s reinforce the essentials one more time—because yes, they really do work.
The 10 Tips for Growing Orchids at Home are:
- Start with an easy-to-care-for species like Phalaenopsis
- Never use regular garden soil—use orchid mix
- Choose a pot with good airflow and light exposure
- Water only when the medium is dry
- Provide bright, indirect light—never full sun
- Fertilize every two weeks using diluted orchid food
- Keep the orchid in one consistent spot
- Clean the leaves with plain water
- Trim only when necessary
- Trust the process and be patient
Orchids teach more than gardening—they teach presence and patience
Once you start caring for an orchid, you realize it’s not just a plant—it’s a teacher.
It reminds you that not everything beautiful happens fast. That care, calm, and routine are powerful. And that the most delicate things in life often bloom when we least expect it.
So don’t worry if you haven’t seen a flower yet. Keep showing up. Keep observing. Keep learning.
And if you want, I’d be happy to design an illustrated version of these 10 Tips for Growing Orchids at Home so you can save it, print it, or share with others.
Just say the word—I’ll make it for you. 🌸