
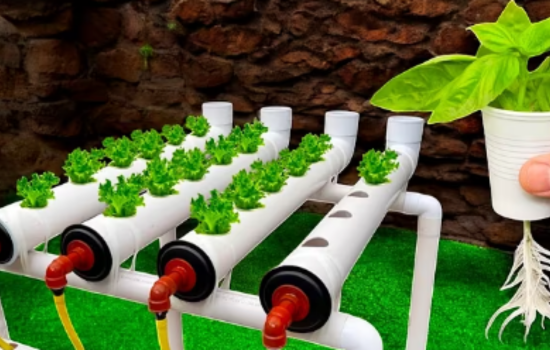
I’m going to show you how to assemble a complete hydroponic system to grow up to 24 plants directly at home.
We’re going to use a 1-meter-long pipe. These pipes usually come in 4-meter lengths, and we can cut them into smaller sections.
We’ll be using 110 mm diameter pipes, and I recommend this size because, when growing lettuce, strawberries, or other plants with large roots, smaller pipes make it harder for roots to grow and block proper water flow.
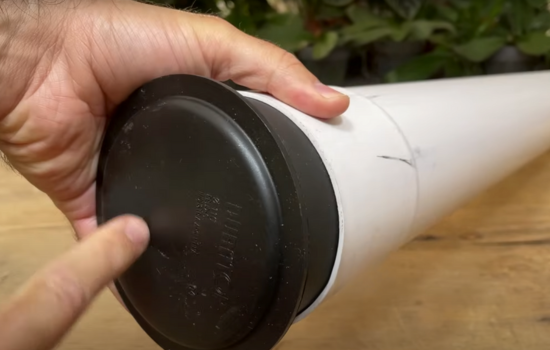
On one end of the pipe, we’ll place a cap and drill a hole in it for water to exit.
On the other end, we’ll attach an elbow so that the water can flow through the entire length of the pipe.
Now, we need to drill holes along the top side of the pipe, where we’ll place the pots.
These pots are commonly used in hydroponic systems, but they can sometimes be hard to find.
So the idea today is to set up the whole system in a way that allows you to use plastic cups or small plant pots instead.
We’ll make holes every 15 cm (about 6 inches). The first hole will be about one finger-width from the edge.

I’ll use a 2-inch hole saw, keeping the spacing even. We’ll mark all the points using a string and tape to keep the line straight along the pipe.
We start with a light drill just to position the hole saw. It’s important to go slowly so that cut material doesn’t pile up at the bottom.
Then, we use a smooth knife to clean off any burrs from the PVC, making the holes nice and even — this will help when placing the cups or pots.
Before going any further, I recommend not gluing the caps. Leave them removable to make cleaning or system expansion easier in the future.
After drilling all the holes, tap the pipe gently to remove any debris left inside — if it stays in there, it’ll float and interfere with water flow.
On both ends of the pipe, we’ll attach the elbows in line with the top holes, ensuring water flows evenly through the whole tube.
I don’t recommend gluing this part either, so it’s easier to make changes later if needed. To seal and prevent leaks, use electrical tape to wrap the joints tightly.
On the other end, since I couldn’t find the exact matching cap for the pipe, I used a different one that fits snugly.
Avoid using black pipes — white is much better, since black absorbs more sunlight and heats the water. This can harm root development and slow plant growth.
We’ll drill a hole in the cap to add a bulkhead fitting or tank connector, which is used to control the water level.
This is especially useful when working with small seedlings, as it lets us keep the water level higher at first and lower it as roots grow.
Use an adjustable valve or elbow fitting to control the water level. When the plant is young, the water should reach the top so the root can access it.
As the plant grows, a smaller amount of water is enough. The water outlet should be facing up to make level adjustments easier.
With everything assembled, seal the cap to the white pipe using tape. Make sure the system is closed and leak-free — even small leaks can compromise the entire hydroponic setup.
To support the pipes, I built a PVC pipe structure, like a table. I used 8 elbow joints to create a frame about 80 cm tall and 1 meter wide.
The four pipes will sit side by side, all level, with no tilt, so that each one stays half-filled with water.
Use tape in an X-shape around the pipes to hold them in place securely.
At one end of the system, we’ll connect an elbow and a hose to carry the water back to the reservoir.
You can soften the hose by soaking it in hot water — this makes it easier to attach and ensures a tight fit with no leaks.
This entire section will collect the water that flows through the pipes and return it to the reservoir.
Next, we show how to calculate the right pump. We’re using pipes that are 1 meter long and 11 cm in diameter.
If each pipe is filled halfway, it holds about 4.75 liters. Multiply that by 4 pipes, and we get around 20 liters total.
The reservoir tank should hold 3 to 4 times the volume of the pipes — so at least 60 liters.
This is important because water will evaporate, and the system needs a stable water volume. The most important thing is that the pump never runs dry.
The pump we’ll use delivers 1,200 liters per hour and can push water up to 1.5 meters high.
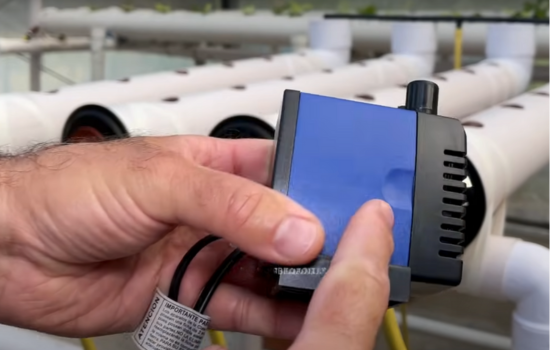
This calculation is key because the pump must be strong enough to move water to the top of the system.
The pump comes with adapters — choose one without a side vent so all the flow goes straight into the hose.
We’ll also create a small filter using garlic mesh bags or similar material.
Tie this around the hose inlet to keep debris out of the pump.
Once everything is set up, we’ll connect the hoses and let the water circulate for a full day to check for leaks.
This step is very important — it helps identify any small issues caused during assembly.
Fix anything that’s not working properly before planting your vegetables, because the system shouldn’t be disturbed while plants are growing.
In the next article, I’ll show you how to prepare the nutrient solution to dissolve in water and “feed” your plants, boosting your chances of success.