
If there’s one plant that stole my heart from the moment I started growing it, it’s the rose.
Seriously—nothing compares. When people see a blooming rose bush in the garden, it immediately becomes the center of attention. It’s beauty, fragrance, elegance, and strength all wrapped into one.
But you know what I enjoy the most? Propagating.
Yep—growing new rose bushes from cuttings taken from an existing plant. And honestly, once I got the hang of it, I never bought another nursery rose again.
So today I’m going to show you how to propagate roses – step by step, exactly the way I do it here at home. No gimmicks, no overcomplication—just real, accessible methods that actually work.
Why propagate instead of buying a new plant?
That’s easy: it’s cheaper, more rewarding, and way smarter.
When you learn how to propagate roses – step by step, you can multiply that gorgeous rose from your neighbor (with permission, of course), save an old family rose bush, or build your own rose garden without spending a fortune.
Even better? A propagated rose adapts better to your environment—it grows up in your soil, under your climate, in the conditions you’ve already prepared.
Best time of year to propagate roses
Let me get straight to the point: the best time is late fall or early spring.
But if you live in a region with a mild climate, you can propagate almost year-round—just avoid extremely hot or cold days.
I’m in Southeast Brazil, and I usually do mine in early September. Works like a charm.
What you’ll need
Before we dive into the step-by-step, here’s what to gather:
- A clean, sharp pruning shear
- Rooting hormone (optional, but super helpful)
- A healthy rose stem (I’ll show you how to choose it)
- Light, well-drained soil (I use potting mix + sand + worm compost)
- Small pot or seedling bag with drainage holes
- Clear plastic bag or cut PET bottle (to create a greenhouse effect)
Got it all? Great—let’s learn how to propagate roses – step by step.
Step 1 – Choosing the perfect cutting
This is half the secret to success.
Pick a semi-hardwood stem, about 20 cm (8 inches) long, with no flowers and a firm, green look.
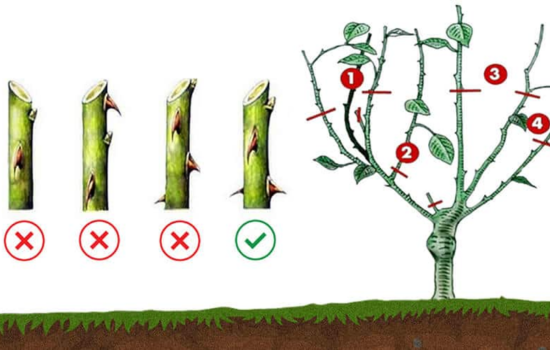
Avoid fresh, green shoots—they’re too weak. Also, don’t use stems with flowers—they drain the cutting’s energy.
Choose one that already flowered but still looks healthy and flexible.
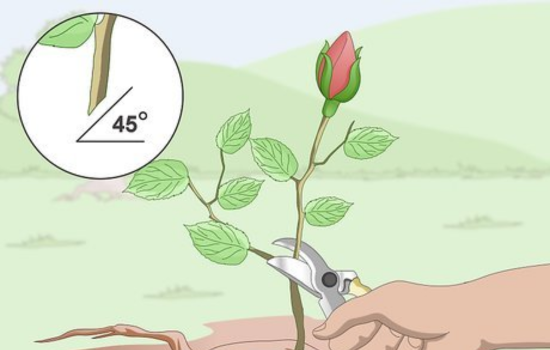
Step 2 – Making the right cut
Using your sterilized pruning shear, cut the stem at a 45° angle, just below a node (the little bump where leaves grow).
Remove all leaves from the bottom half of the stem and leave only two at the top. This reduces water loss from transpiration.
If you’ve got rooting hormone, dip the cut end into it for a few seconds. I use it whenever I have it, but I’ve had success without it too.
Step 3 – Preparing the soil and planting the cutting
Fill the pot with moist soil mix.
Use your finger or a stick to poke a hole, then gently insert the cutting.
Push it down about 10 cm (4 inches), leaving the rest above the surface.
Firm the soil around the stem and give it a light watering.
Step 4 – Creating a mini greenhouse
This part is pure magic. It keeps humidity in and protects the cutting early on.
You can use a clear plastic bag over the pot like a little dome, or cut the bottom off a PET bottle and cover the plant with it.
This keeps the air moist around the cutting and reduces water loss.
But be careful: allow some airflow. Make a few holes in the plastic or leave a small gap open. Don’t over-seal it.
Step 5 – Where to place the cutting
Put the pot somewhere bright but out of direct sunlight.
I keep mine under my covered porch—gets plenty of indirect light, but no heat or harsh rays.
Water lightly every 2–3 days. Just enough to keep the soil moist. Never soak it.
After 30 to 45 days, if all goes well, the cutting will begin forming roots.
How to check?
Give it a gentle tug. If it resists, it’s rooting.
Transplanting and caring for your new rose
Once roots have formed, you can transplant your rose into a larger pot or straight into the ground.
But go easy—cuttings are still delicate.
For the first week, keep it in partial shade, gradually exposing it to more light.
Feed it with organic compost or worm castings, and continue with moderate watering.
Give it a bit of time, and before you know it, your little cutting will start sprouting new growth… and then flower buds!
Problems that can happen (and how I handle them)
Yep, not every cutting makes it. And that’s okay.
Here are a few mistakes I’ve made—and how I fixed them:
- Cutting too soft: it turns mushy and dies. Go for semi-hardwood.
- Overwatering: rots the base. Always use a light, well-draining mix.
- Direct sunlight: burns it. Keep in shade.
- No ventilation: creates mold. Vent your mini greenhouse!
Now I have about 8 out of 10 cuttings rooting successfully. That’s a big win.
Let’s recap: How to propagate roses – step by step
To lock this into memory, here’s a quick summary:
- Choose healthy, semi-hardwood stems with no flowers
- Cut at an angle just below a node
- Remove bottom leaves, leave 2 at the top
- Use rooting hormone if available
- Plant in light, well-drained soil
- Cover with clear plastic to create humidity
- Keep in bright shade and water lightly
- After 30–45 days, roots should start forming
- Transplant carefully and help it adjust to sunlight
Follow these steps and your success rate will grow fast.
My personal experience with rose propagation
Propagating roses has become one of my favorite garden rituals.
Every time someone visits and compliments my roses, I proudly say, “I grew that one from a cutting!”
More than saving money or applying a technique, it’s about connecting with nature.
You take what could’ve been a discarded stem and turn it into a blooming new life. It’s nearly magical.
And the best part? When that first bud appears on a cutting you grew yourself—it hits different.